1Stream Engage Required
1Stream Engage Required
This feature is available for only 1Stream Engage licensed users and higher plans. If you don't have this and would like this feature to be available, please reach out to your Sales Representative to upgrade user licensing.
How does this work?
This call flow app allows callers to trigger the PIN Verification Tool automatically in an IVR, instead of having your team manually send them the PIN code to verify. Once they reach your team member, the contact record will open and show that they have been verified, allowing your team member to immediately assist them knowing they have been verified.

The system will only use the automatic verification process when the caller can be matched to a singular contact in your primary CRM, otherwise it will skip and your agent will have to manually verifying the caller after selecting their contact from the multi-match list.
Callers have the choice between Email (Option 1) and SMS (Option 2) to receive the code. If they don't receive it, they can press * to reach the failed destination immediately.
This is different from the Security PIN Routing which allows you to set a static code that the caller must know to pass through.
Setting up Inbound PIN User Verification in 1Stream
- Log into the 1Stream Admin Portal.
- Go to the Administration > Manage Organization menu in the top right.

- At the bottom of the page, open Phone System Enhancements > Edit Auto PIN Verify Settings

- Define the PIN Verify Success DN as the destination callers should reach when properly verified
- Define the PIN Verify Failed DN as the destinations callers should should reach when they cannot be verified
- Click the Save button.
Creating Custom Routes
Use this section if you are configuring Inbound PIN Verification for multiple departments (Support, Accounting, etc.) and require different PIN Verify Success/Failed DNs. For instance, callers press 1 for Support and 2 for Accounting. You would like both options to challenge user verification and have separate call queues for the Support and Billing departments that the caller needs to be sent to next.
Create New Sub-IVR Menus
Reference article: Creating IVRs and Auto Attendants - 1Stream
- Login to the Control Portal (phone system administration side)
- Open your phone system and navigate to Call Flow → IVR
- Click the Add IVR button
- Digital receptionist (IVR) Name: Set this to a name that is specific to its purpose, e.g., "Accounting Auto PIN"
- Digital receptionist (IVR) Number: The internal extension number of this IVR. Leave as-is or change to your preference
- Scroll down to the Options section
- If no input within seconds: 1
-
Send call to: Call Processing Script → autopinverif

- Save and repeat process for any additional department specific calls that will utilize Inbound PIN Verification
- Edit the Primary IVR where your callers are making the selection for “Sales” and “Accounting”
- Change these menu options to send to Digital Receptionist and select your newly created sub-IVR
Set Custom Auto PIN Routes

- Navigate to Phone System Enhancements → Edit Auto PIN Verify Settings
- Click the green Plus (+) icon next to Custom Auto PIN Settings
- Add a Title for the custom route that is specific to its usage, e.g., "Accouting PIN Verification"
- In the Previous Hop drop-down, select the IVR that sent the caller to the “autopinverif” Call Processing Script, e.g., "Accounting Auto PIN"
- Define the Success DN as the internal extension destination callers should reach when properly verified
- Define the Failed DN as the internal extension destination callers should reach when they cannot be verified
Setting up the Inbound PIN Verification in the Phone System
Feature Activation Notice
In order to get the Call Flow App installed, you'll need to reach out to our support team and request the install. You can Create A Support Ticket via our portal under General Request > Install a Call Flow App
v20
- Login to the phone system
- Go to Call Flow > IVR
- Edit or Create the IVR that should point at the app
- Under the Menu Option you desire, set it to Send to call flow apps
- Pick the autopinverif application
- Click Save
When users press that menu option, they will route to the app and once verified proceed to the PIN Verify Success DN, or if it fails to the PIN Verify Failed DN.
v18
- Log into the bvoip phone system.
- Go to the Call Flow > IVR section.
- Edit or Create the IVR that you're working with.
- Scroll down to the Destination for invalid or no DTMF input section.
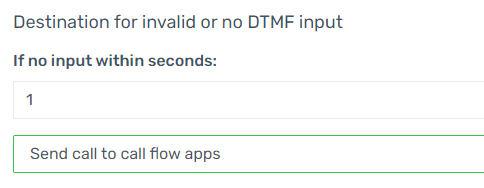
- In the If No Input Within Seconds field, add the number of second before routing the call to the PIN verification prompt.
- In the drop-down directly beneath, select the Send Call to Call Flow Apps option. The Destination drop-down will then make itself available.
- In the Destination drop-down, select the autopinverif.Main option.
- Click the Save button.